Pages

Tuesday, January 31, 2012

Easy Sew Curtains

Want to learn how to sew curtains? Sewing curtains yourself can save you loads of money! I love this easy DIY it gives you a lot of bang for you buck. Curtains add so much pizazz to a space. So let's get started on how I did this. Again, I'm not a seamstress and have very little sewing experience so if I can do it, you can to.
First off my ceilings are 8' so I got 6 yards of fabric, 3 yards for each side of the window. My fabric was 54" wide.

What you will need for this project is:
Fabric
Iron
Pins
Ruler or measuring tape
Sewing machine
Cordinating thread (I used a light cream)
Scissors

Okay let's get started, wash your fabric if it's machine washable. You want to pre-shrink your fabric. You don't want any of your seams to pucker so this is an important step. Then Iron all of the fabric.

Next, I just laid out my fabric and folded it in half. Then cut right down the middle so I had two panels of 3 yards. You  might be able to have the fabric store do this step for you.

Then I took the sides Folded over 1.5" ironed and measured as I went along to make sure it was accurate. You can make this hem as big or little as you want. I chose 1.5" because I like the way it looked. Then fold over one more time and iron and pin as you go. Your edges will look like this. Then repeat the same steps on the other side.


When you come to the edge you don't have to back stitch this one, because you'll be folding up both hems on each side.
Then it's time to sew your top. I did mine with a 3" hem to fit my rod.
Next iron and pin again, at this point I was squealing with delight because it was sooo easy. I kept thinking I can do this, I can do this. Plus I only managed to burn myself once with the iron, if you know me at all, I burn myself on everything. I usually burn myself on kitchen appliances I think I've been burned by all of them even the dishwasher, yes I didn't even know that was possible.

Now just sew up the top hem on the edge leaving enough space for you rod. I don't know what I was thinking but I didn't take any pics for the bottom hem. Basically it's the exact same thing as the top hem. Once I had the top done, I hung them up and then pinned at the bottom where I wanted them. I did a 7" bottom hem and I left mine a bit longer then usual. I like curtains to graze the floor, I normally wouldn't have them this long. I left mine a bit longer because I might be moving and need the extra length. That way I can always unpick the hem and have a little extra fabric.  You can sew your hem anywhere from 3-7" is fine. One more thing, when hanging your curtain rod if you put it all the way up to the ceiling and to the sides of the window it will make you space seem bigger!
Your done sewing! Congrats you did it, now take a step back pat yourself on the back and admire you new curtains, I know I did.


The DIY Dreamer

Monday, January 30, 2012

Rugs


Here's some rugs that I've been crushing on lately. 

Source: dashandalbert.com

This rug from Dash and Albert is amazing! After having to pick up the crusted food and drink my one year old throws onto the floor this would be so nice to have. By the way, any tips on getting her to stop throwing all her food on the floor? After dinner it looks like she got into a food fight with the dog that's begging below her. As I have to clean up ALL the mess... Anywho....
This Indoor outdoor rug is srub-able, bleach-able, and hose-able. Uh-mazing..... It definitely would be nice.


Source: rugsusa.com via Debbie on Pinterest

I love the colors in these rugs. I would love to see the navy blue one in a little boys room. The coral rug would look great anywhere. Caitlin Wilson used it in her home office and it looks beautiful.


What about you, any rugs that you've bought and completely died over or hated, and for what reasons? I would love to know.

P.S. Tomorrow I'll be posting about how to make easy-sew curtains made from this fabric. Believe me it was easy and I'm not a seamstress.

Saturday, January 28, 2012

Nursery Design!


Here's an inspiration board of a baby girls nursery I've been working on. I can't wait for it to come together!


Friday, January 27, 2012

Design School Fridays

I thought I would start teaching an element or principle of Interior design every Friday. I am hoping that someone might learn from it. These principles and elements are used by interior designer's everyday to achieve great design. Today were talking Emphasis.
Emphasis is the domination in the room, or let's say the focal point. It's the first thing that catches your eye.
When designing a room look around and see areas that naturally stand out, an amazing fireplace, beautiful architectural windows, a great piece of artwork, a bright sofa, a stunning bed, a gorgeous wall treatment. You want to create centers of interest or focal points. Chose your area of emphasis and downplay the other areas around it, you don't want everything in the room to stick out.
Here's some great examples of emphasis being used well in a room.


In this room the wallpaper draws your first attention, it's the show stopper in the room, the bed comes second then the lamps. Notice how everything else is pretty neutral to allow your eye to focus on this stunning wall.


This back wall creates a dramatic focal point, the brass swing armed sconces mixed with the modern wallpaper and oval mirror makes for a dramatic bathroom.


The focal point in this room is the peacock blue fireplace. Your attention goes straight to the wall of bookcases. Adding a mirror or great piece of artwork is a nice way to draw the focus into the space.


In this kitchen you eye is drawn straight back to the bright white subway tiled wall with open shelving. the hood above the stove is the main emphasis in the space. The lighting dripping down the tile is also a good way to draw your eye to the space.


Pattern on pattern can be tricky, to much and you can lose a focal point. But here your eye goes straight to the bold mirror and allows your eye to drift to the wallpaper and bench quite easily, without going into overload.

Images via {here,here,here,here}


Thursday, January 26, 2012

Decisions

Does anyone else have the crazy obsession of painting furniture multiple colors to see which color you want? I don't know about you, but I do it all the time. Here's my dining table I'm trying to decide on what color to paint. I think I decided with grey. Try not to mind the horrible picture..=)

Wednesday, January 25, 2012

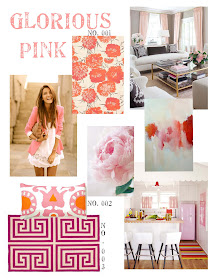
Glorious Pink

Pink, one of my favorite colors. Ultra feminine, luxurious, fun and uber modern. Pink goes well in just about any room. You can sneak it in, and maybe your husband might not even notice. Cross your fingers hopefully...

Here's some lovely pink inspiration to start you day.


No. 001: Fab Pink Wallpaper
No. 002: Pillow
No.003: Greek Key Rug

Images via {here, here, here, here, here, here}

Tuesday, January 24, 2012

COZAMIA Love

Have you seen COZAMIA for Mi Casa?
They have lovely prints that are sure to awaken any room. Best part is they're affordable, and they come in a variety of sizes. Could it get any better?
Here are some of my favs.


Aren't they lovely? I'm thinking of getting the night peonies in blue. Which one would you get?

Monday, January 23, 2012

Fabric In Embroidery Hoops

Here's the Embroidery hoops for little miss B's nursery.  I was inspired by this and this. Today I'm going to walk you through on how I made this.


First start out with ironing all you fabric. Then cut them about one to two inches wider then your embroidery hoop. You can find embroidery hoops at your local craft store, there usually in the yarn section.


I printed out the B on paper, cut it out, and traced it onto the fabric with a pen. Then I just free handed the leaves. I used an acrylic paint mixed with a fabric medium. If that scares you, you can always use some sort of stencil.


I did about 3 coats of white paint. You can still see the pen marks but that's okay because were going to outline it.


I outlined it in silver. You can do any color that suits your fancy.


I tried to tape the back with double sided tape and it worked great. It just uses a lot of tape! But if your putting a fabric in there that you don't want ruined this is the route to go. After the first one I ended up just doing a strip of hot glue on the wood and folding over as I go.


Then I just secured it on the wall with nails.
There you have it!

Thursday, January 19, 2012

Design School Fridays

I thought I would start teaching an element or principle of Interior design every Friday. I am hoping that someone might learn from it. These principles and elements are used by interior designer's everyday to achieve great design.
Today, were going to talk about Balance, Symmetry and Asymmetry.
First off lets talk about Symmetry. Being symmetrical means if you cut a room in half it would be a mirror image of each other.
For example:


See how on both sides are perfectly balanced? Having symmetry is usually always pleasing to the eye. It's a great way to start if you have no idea what to do with the other side of the room. You can use symmetry to complete the room. Though, sometimes this tends to get boring but usually always leads to a great classic result!


Here's a great example of asymmetrical rooms:


Even though these rooms aren't symmetrical, each side of the room balances the other side out.
Assymetry always makes for a more interesting room. When your decorating, make sure your room is balanced whether your using asymmetry or symmetry.


Tangerine Tango

Have you heard..... the new color of the year is tangerine tango. Of course you have.. I thought I would put together a little mood board on the color of the year.
I'm not one for redoing your whole house based on new "trends". But you could always freshen up the space with something small.


No. 001 Caitlin Wilson Pillow
No. 002 Chair
No. 003 Rug

{sources Bathroom, Bedroom}

Wednesday, January 18, 2012

Love Printables

I made some free printables for valentines day! Your welcome to print them off and use them. Just don't post them on your blog without a link back to mine. This is my first time doing printables so let me know if you have any problems. There 8.5" x 11" so you can use regular card stock or paper.


Download Here

Download Here


Hope you enjoy them!

Tuesday, January 17, 2012

Fabric

I'm in the middle of doing a project for my nursery. Have you seen these pictures of fabric in embroidery hoops? I love the idea and it's very inexpensive, especially if you already have the fabric on hand.


{Source}

I'm doing some for Bryn's room! I'll have some pictures up next week.

Saturday, January 14, 2012

Chalkboard Wall

I wanted to make a chalkboard wall in my kitchen. I found the perfect spot, it's a little out of the way so it won't take up to much visual clutter. Perfect for writing reminders, love notes, goals, quotes, entertaining the kiddos, lists, the possibilities are endless. The best part once I'm sick of it, I'll just paint over it.


All and all it was a really simple project. It took less then 24 hours to complete!